Expand the basic application
Now that we have created the basic CRM application, we are going to expand the application with the next additional features:
-
Edit existing company data
-
Delete company data
-
Use conditional elements
-
Search and filter company data
-
And then finally we are going to use the Ontology feature in WEM to implement static pick lists.
Edit existing company data
The edit feature is the easiest one to implement. You just have to create an exit from the Company overview user interaction node and connect it with the existing Company details form. There are basically two ways to implement the edit feature:
1. With an edit button
2. On row click in the datagrid
Edit button
First return to the Companies flowchart and open the Company overview user interaction node.
Click on the Datagrid, scroll the table towards the right using the slider at the bottom of the Datagrid – see below.

Place the cursor at the end of the Datagrid left of the last box (Company email). A blue vertical line with a blue plus (+) will appear.

Press the blue plus (+) buttom and a new column will be added to the panel.
Notice that a new column (column 5) has been added to the data grid. You may have to slide towards the right to see this new column.
Next place your cursor in the new column (column 5) – on the bottom cell of the new column.
Now place a new button by clicking and pulling the Button option in the top menu of the template editor into that bottom cell of the last column.

In the popup window click ‘Follow button exit’ and name the new button Edit, and click Ok.

The result should look something like this:
Note: don’t forget to Save your template!!

Now return to the Companies flowchart.
To complete the edit feature, connect the Company overview user interaction node with the Company details user interaction node and select the Edit exit.

You can grab and stretch the green ‘List node Company: Add row’ icon, so that the straight new line is visible above it.

Tip: you can show the Company details user interaction node as an overlay. Just click on the Company details user interaction node and select the Show as overlay option in the Node properties pane on the right side off the screen.

Now you can Preview the additional edit feature. The Company Details Overlay will look something like this.

Delete company data:
First return to the Companies flowchart and open the Company overview user interaction node.
As you did to add the Edit Button, click on the Datagrid and go to the end of the panel and add a new column.

Click on the bottom cell of the new column and place a new button in this cell by dragging a Button icon from the top menu into this cell.
On the drop down list, select “Follow button exit”.
.jpg)
Then name the new button: Delete and press OK. A new Button will appear in the last column called Delete. Don’t forget to save.
The result should look something like this:

Note: If you ever want to remove the created columns, you will have to remove the buttons and then the column itself.
Now return to the Companies flowchart.
To complete the delete feature, drag and drop a green List node onto the canvas and select Company. Press OK.

The default action of the green list node is Add row, but we need to Delete current row. To do this select the action Delete current row from the Node properties pane on the right side of the screen.

Next connect the Company overview user interaction node with the green list node and select the Delete exit.

Finally, connect the green Delete current row list node to the Save all database list changes.
The result should look something like this:

Preview your project and delete some records.
Conditional elements:
With WEM, you can easily create web applications that respond conditional to data or user input.
You can create conditional elements in flowcharts, but also in user interaction screens.

In this section we are going to implement a feature that checks if there is company data in the
Data base (Company list). If the list is empty (no company record at all) we want to present a clear notification on the screen.
We are going to use a WEM function and the WEM Expression editor for the first time.
Conditional in user interaction screens:
First return to the Companies flowchart and open the Company overview user interaction node.
Place your cursor behind the Company overview title and press [Enter] to create an extra line between the title and the Company data grid.
Click on the Conditional button in the top miscellaneous menu of the template editor and drag down to the line below the header “Company Overview” – as shown below.
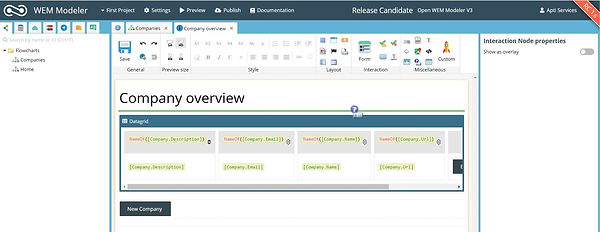
The WEM Expression editor appears.
In short: the WEM Expression editor is a text editor where you can use simple functions and commands to extend your WEM logic. The WEM Expression editor looks and feels like the Visual Basic Editor in Excel.
Next click on the Show Functions button.
Then unfold the Aggregation folder.
Select the Count function by double clicking. This places “Count(values)” into the WEM Expression editor field.

The Count (values) function is now placed in the WEM Expression editor.

The Count (values) function returns the number of items in a list. With this function you can determine if there are records (and how many) in a list.
In our expression we need to determine if there are 0 (zero) or more than 0 (zero) records in the Company list. When 0 (zero) records are determined a clear notification (e.g. “There are no companies found!”) is displayed.
Now we have to replace (values) by the Data model list name Company. You can simply select ‘values’ by double clicking it and type [Company] between the brackets. Or select it from the Data model tab by selecting and pulling the 'company' data model list between the brackets.

Complete the expression in the WEM Expression editor as follow:
Count([Company])=0
You can optionally check the expression by clicking the button 'Validate code'.
Next click Ok.
The result should look something like this:

A green bordered conditional frame is shown in the template editor.
Next place your cursor inside the green bordered conditional frame.
Now you can place the notification “There are no companies found!” inside the green bordered conditional frame. Everything placed within the green bordered conditional frame is shown when the condition is true.

Preview your project and test the conditional notification. Remember to delete all the Company records.
You can also use an Alert panel from the Layout option in the top menu off the template editor to emphasize the notification.

Don’t forget to save your data!
Conditional in flowcharts:
Next we are going to implement the same feature as described above, but now we are going to implement the feature in a flowchart with a yellow decision node.
First return to the Companies flowchart.
Drag and drop a yellow decision node onto the canvas.

Now the WEM Expression editor appears. Use the same expression as you used in previous feature (Count[Company])=0). Click Ok.

Next drag and drop a user interaction node and name this Notification.

Double click on the Notification User Interface node and bring up the Notification User Interface Panel template editor.
In the template editor, delete the title ‘Notification’.

and place a Layout>Alert with the text “There are no companies found!”
Note: don’t forget to Save your template!!


Next create 2 Exits for the Notification user interaction node. Name one Exit button Back and the other one Add company.
Remember to Save the template.
The result should look something like this:

Next go back to ‘Companies Flowchart’.

Connect the Start node with the yellow decision node. Connect the yellow decision node with the Notification user interaction node and select the Exit Yes.
Next connect the yellow decision node with the Company overview user interaction node and select the Exit No.
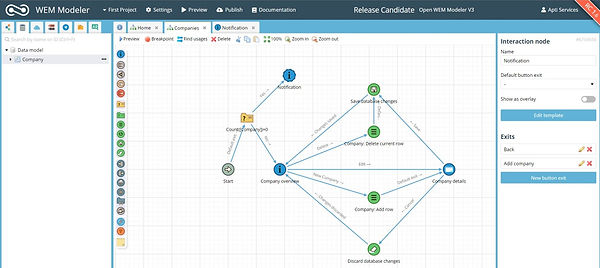
You are going to create two Exits for the Notification user interaction node - Back and Add company.
To create the Back exit, drag and drop sub-flowchart node onto the canvas, select the flowchart Home and connect this with the Back Exit of the Notification node.

Finally, connect the Notification user interaction node with the green list node Add row: Company and select the Add company Exit.

Tip: rearrange the flowchart to avoid crossing arrows. The result should look something like this:

You can view the Expanded CRM application and use it by pressing Preview.
Search and filter company data:
In the previous sections you have learned to create a basic CRM application to store and edit
company data. Once the application contains data, there is a need to quickly retrieve stored data.
With WEM, you can easily build filters and search features. In this section we will show you how to do that. There are basically 3 steps to create a search feature:
-
Create a search field (or search fields)
-
Create a filter on a data model list, based on that search field
-
Use the search field(s) and the filter in a template (user interaction node)
Create a search field:
The first step in creating the search feature is to create a search field (or search fields). Suppose we want to search company data by company name. Then we have to create this search field (e.g. Company Name) in the Data model.
Click on the Data model icon. We are going to arrange all the search fields in a separate folder (e.g. Search fields) so we can distinguish these search fields from the Company data model list.
Click on the Data Model folder (the top folder in the data model lists). 3 dots will appear at the end of the line. Click on the 3 dots and click on New Folder.
Name the new folder Search fields. Also use a technical name e.g. SearchFields (no space).


Next create a New field named Company name in the Search field folder. Also use a technical name SearchFields.Company name.

Next create a New field named Company URL. Also use a technical name SearchFields.Company URL.
Next create a New field named Company description. Also use a technical name SearchFields.Company description.

Next we are going to use this search field in a filter.
Create a filter:
You can create filters on a data model list. Then you can use these filters in user interaction screens.
First, open the the Company data model list by clicking the black arrow in front of Company once. This opens the list below.
Then click on Filters and select New filter.

Enter the list filter name Search on company name and click on Filter expression.

The WEM Expression editor appears. Here we can define our filter expression. We are going to use the function contains.
This function checks if a string (text) contains another string (text).
This check is not case-sensitive and ignores diacritics.
In our case we need to check if the text in the Company name of the Company list corresponds to (a part of) the text in the search field Company name.
Technical name: now you can see the importance of the use of a technical name. With a technical name, you can distinguish between fields with the same display name (in this case Company name). One field belongs to the Company list and the other to the search fields.
First select the Name field from the Company list by dropping the field on the left side of
the WEM Expression editor.

Next type the function contains after the field name [Company.Name]. The function will be highlighted in blue.
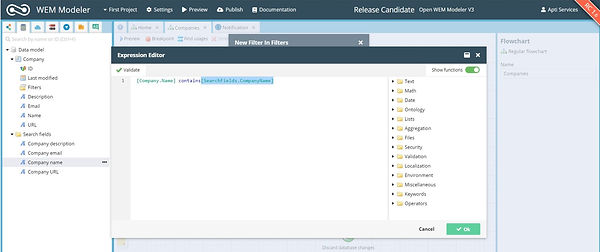
Finally select the Company name from the Search fields folder. The expression in the editor popup window should look like this:
[Company.Name] Contains [SearchFields.CompanyName]
Click Ok on the Expression Editor and then Save on the popup window.

The filter on the Company list is completed and now we can use it within the user interaction screen Company overview.
Use search field and filter:
Return to the Company overview user interaction node in the Companies flowchart.
You are going to place the Company name search field in the template e.g. between the green conditional and the Company data grid.
To do this, you will use a Form to place the search field.
Go to the Interaction icons at the top of the User Interaction screen and drag and drop the form icon just below the Green Conditional panel.
Next drop the Search field ‘Company name’ from the Data model in the form.
Then change the search field Company name Label into Search by name.
In the right hand pane under Behavior – change the Refresh screen icon under the heading On Change.
The result in the template editor should look something like this:

The last step is to use the previous defined filter on the Company list.
To do this select the company Datagrid panel in the middle of the User Interaction screen. Go to the Datagrid Properties panel to the right panel. Under Filter click on the button at the end of the selection box. A popup window should appear. Select the Datagrid filter Search on company name.

Tip: don’t forget to Save your template!
Now you can preview the project and search for company data by company name.

Reset search field
To make sure that the search field starts empty, you can flush the search field before entering the Company overview user interaction node.
We are going to use a green assignment node to do this.
Return to the Companies flowchart. Drag and drop a green assignment node onto the canvas.
Select the Company name search field from the Search fields’ folder.
Note: the default Action of the green assignment node is New value. To flush the value of the Company name search field, change the Action into Clear value in the sidebar on the right.

The last step is to connect the assignment node to the Start node and the yellow decision node.

You can test the new changes by pressing Preview.
Reset search field with an action flowchart
We not only want to perform a reset of the search field before entering the screen, but also on
the screen itself (for example with a reset button).
We will use the same assignment node for this, but now in an Action flowchart.
Why? So we can reuse this reset feature.
Action flowchart
When a flowchart does not require any user interaction (e.g. a calculation, or in this case a clear value action), you use an action flowchart. If your action flowchart references other flowcharts, it can only reference other action flowcharts (with no user interaction). For exposing web service functionality you can ONLY use action flowcharts.
Return to the Home tab of the modeler and click on the Flowcharts folder.
Create a New flowchart.

Select Action flowchart. Name the new flowchart Clear search fields.

Next double click on the ‘Clear Search field Flowchart’. Then drag and drop a green assignment node onto the canvas. Select the Company name search field for the assignment node and change the assignment node Action from New value into Clear value.

Drag and drop an 'end of flowchart' node onto the canvas and connect all the nodes.
The result should look something like this:

Now return to the Companies flowchart and delete the previously added assignment node.
Drag and drop a sub-flowchart node onto the canvas and select the Action flowchart Clear search fields.

Finally connect the sub-flowchart node with Start and the yellow decision node.
The result should look something like this:

Next we are going to use the same Action flowchart within the Company overview user interaction node to reset the Company name search field manually with a button.
Return to the Company overview user interaction node. Create a new button between the conditional and the Search by name search field and name it Clear. Attention: instead of Behavior ‘Follow button exit’ now select ‘Execute flowchart’. In the popup window select Clear search field.

The result should look something like this:
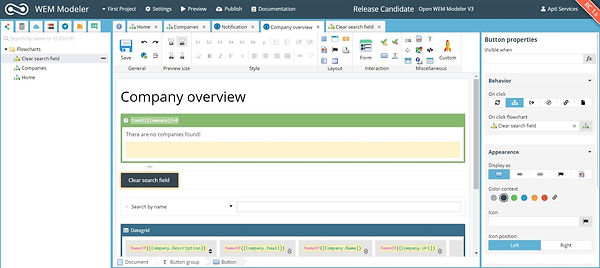
Preview your project and test the Clear Button.
Expand search with additional fields
In the previous section we had implemented one search field – Company Name.
Now you are going to expand search to include Company Description, url and email.
To do this, you will need to execute the following 4 steps:
-
Add search field(s) to the Data model
-
Expand the list of filters on the Data model list (in our case Company)
-
Add search field(s) to the user interaction screen
-
Don’t forget to clear all the search fields before entering the user interaction screen and when pressing the ‘Clear’ button. You have to expand the ‘Clear search fields’ Action flowchart.
Add a search field to the Data model
Go to the Data model and add a Text field named Company description to the Search fields folder. Also use a technical name SearchFields. Company description & press Save.
Now repeat this action for Company url & email.
Press Save again.
Expand the filter on the Data model list
Go to the Data model list Company / Filters and click on the Search on company Name button.
A popup window appears. Click on Filter expression and the WEM Expression Editor appears.
Expand the expression that is already there (and we used for the 'search on company name') with search expressions used for company description, company website and company emails. You can type the expression text shown below or select the fields from the Data model tab on the left side of the expression editor.
[Company.Description] Contains [SearchFields.CompanyDescription]
and
[Company.Website] Contains [SearchFields.CompanyUrl]
and
[Company.Email] Contains [SearchFields.CompanyEmail]
Then click Ok.
The result should look something like this:

Add search field(s) to the user interaction screen
Go to the Company overview user interaction screen on the Companies flowchart.
Drag and drop the following Search fields - Company description, Company URL and Company Email – from the left hand pane, to the existing Form, where you have already setup the Search by Name field.
Change the search field names in the form to Search by description, Search by Url and Search by Email.
As you add each field, change the Refresh screen icon under the heading On Change. This is found in the right hand pane under Behavior.
Don’t forget to Save the template!!
The result should look something like this:

Clear search fields by expanding the ‘Clear search fields’ Action flowchart
Go to the Action flowchart ‘Clear search fields’.
Drag and drop a green Assignment node onto the canvas. Next select the ‘Company description’ field from the search fields folder. Select the assignment ‘Clear value' field at the Action flowchart on the right side of the panel.
Do the same with Company Url and Company Email too.
Finally connect the Assignment nodes to the Start node and the End node. The result should look something like this:

To preview go to the Home flowchart and press Preview.
Use of suggestions
You can use suggestions when entering a form field. For example: when an end-user types the first 3 characters of a Company name, WEM may suggest stored companies that match the entered first 3 characters or contain those 3 characters in the Company name.

How do we implement suggestions?
First return to the Company overview user interaction screen.
Click once on the Search by name field in the Form.
Next click on Datamodel auto completion in the properties panel on the right side of the screen. In the popup window select ‘Company’. Press OK.
Change the Search mode option into ‘Contains’ and the Min characters into ‘3’.

Then, once again in the right hand panel, click on Suggestion text.
WEM expression editor pops up. Select Company Name from the Filters in the Data model folders on the left side and then click Ok. The result should look something like this. Click Save.

You can check that the suggestion works by going to the Companies flowchart and running Preview. You will find that when you type in the first 3 letters of a name the suggestion box appears.
The Suggestion should look something like this.

Return to the Company Overview User Interaction screen. Repeat the above process for the other search fields – Search by description, Search by email and Search by URL.
You can Preview the application.
Creating Concepts – Business Entity
In your CRM application you will now provide the ability for users to select the type of company they are entering into the database. You will do this using Concepts.
Go to the left hand pane and select the Concept and Concept queries icon.

Now click on the folder 'Concepts' and the three dots at the end. Click on + New Child Concept.
We want to create three Business Entities: sdn bhd, LLP and Sole Proprietor. We will do it by creating New Child Concepts under 'Business Entity'.
A popup window appears titled New Root Concept. Write Business Entity as the Local Name & click create.
Click on the new created Business Entity Concept and click on the three dots at the end of the line.
Click on + New Child Concept. A popup appears titled New Concept in Business Entity. Write sdn bhd for the Local Name and press Create.
Do the same with the next two other Business Entities: LLP and Sole Proprietor.
Now that you have setup the Business Entity Concept, it is time to include this into the Company Data model list. To do this, click on the database icon at the top left of the icon and click on Company. At the end of the line click on the three dots and click + New Field.
The popup New Field in Company appears. Type 'Business Entity' in the Name field.
Click the drop down under Type and select Single Select.
Then click the icon under Root Concept. Click Business Entity and then click save.
The Concept Business Entity is now a part of the Company Database model.

Creating Concepts – Industry
To create an industry list, repeat the above process we did for Business Entity. This time the New Child Concept will be Industry and it’s Child concepts will be specific industries. In the example given below the industries chosen are: Print Media, Online Media, TV Media, Radio Media and OOH.
The Concepts section in the left sidebar should look something like below:

Incorporating Concepts into the Company Overview User Interface
Now that we have updated the Company database list to include the new concepts of Business Entity and Industry, we can use these in our User Interfaces.
Go to the Company Overview User Interface and click on the datagrid.
Add another column at the end of the datagrid.
Drag and drop the Business Entity field in the Company database list into both the top and bottom rows of the new column.
When dropping into the cells, click the selection 'create label'.
Both the top and the bottom cells of the new column should read Company.BusinessEntity. As shown below.

Click on the top cell, which will bring up the Label Properties panel to the left as shown below.

Click on the Expression at the top of the panel, and the WEM editor will popup.
Click on show function.
Click on Lists to expand the folder. Under Lists you will find fx NameOf. Double click this.
Nameof(data item) will appear on the first line in front of Company.Business Entity
Edit this line, by replacing the text 'data item' with the Company.Business Entity – as shown below & click OK.

Next click on the Business Entity Column in the datagrid and highlight the whole column. 3 dots should appear at the top of the column. Placing the cursor on top of the 3 dots and you will see an arrow either side. Click on the left arrow and move the column left in the datagrid.

Move the column left, so that the edit and delete buttons remain at the end of the datagrid. You can position the Business Entity column where you desire on the table.
Do not forget to save the User Interface.
Now, repeat the process and add a new column for the Industry entity.
Incorporating Concepts into the Company Details User Interface
Open 'Company Details User Interface' from the the company flowchart that you have already setup.
Drag and drop the Business Entity and Industry data elements (from the Company Database list).
You can move the rows upwards and place where you would prefer on the panel.
The screen should look like below:

You have now added the ability to show list selections.
Go to the Home flowchart and click preview to see the application working.

Integrating External Web Services
In this section, we are going to expand the application and the use of external data by interaction with a web service in WEM. To facilitate this section we will use publicly available web services. We are going to use a public service with "Country data" to add to our CRM application.
Add web services (consume)
WEM applications can use web services to integrate with external systems. One of the simplest ways to integrate in WEM is to use SOAP ("Simple Object Access Protocol"). It is highly standardised and self-documenting messaging framework, where everything you can do is strictly defined in a WSDL ("Web Service Description/Definition Language") document.
First return to the Home Tab of the modeler and click on the Web Services icon on the top of the Left Hand pane. Here you can add SOAP-based service to retrieve external data.

Click on WEB services (consume) and then click on the 3 dots at the end of the line.

Click on Import Web service. The popup titled Import A Web Service appears.
We are going to use a URL from which we can load the service's WSDL ("Web Services Description Language") file. This file contains the description of the web service we want to use.
We use the following URL:
http://webservices.ademei.nl/webservices/countryservices/?wsdl
Enter a short but clear Service name, for example "Country Services".
Copy and paste the above URL into the popup, where a URL is required. Then press Import.

WEM is importing the WSDL definition into the modeler.
You will see that a web service "Country services" has been created in the modeler, in the left hand side panel. Unfold the service, and 6 methods (also called functions or operations) are presented. Every method performs a specific function / operation within the webservice.

You can unfold every one of the 6 methods. Notice that every method has an Output folder and some have an Input folder. Every folder contains fields that we can use throughout our WEM project.
Test web service (consume)
Before we use the "Country services" SOAP web service that we imported in the previous section in flowcharts, it is wise to test the web service and it's behaviour first.
Return to the Home tab and click on Flowcharts. Create a new Regular flowchart by clicking on New flowchart.

Name this flowchart "Test Country services".
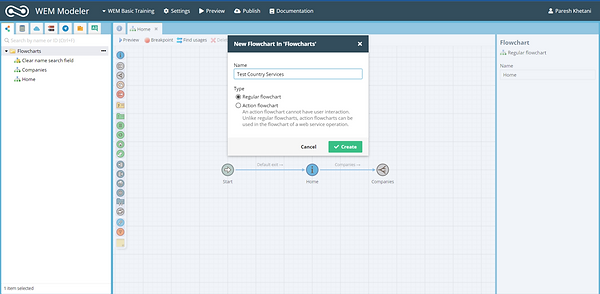
Drag and drop a User Interaction node onto the canvas and name it "Input Country services" and double click on the node.
Place a form below the title and select it by clicking it once.
Note: instead of selecting fields from the Data model we are going to select fields from the Web services (consume) folder.
Unfold the Web service (consume) folder. Next select the "Country-Name" field from the "Input Folder" of the method "GetISOCodeByCountryName". Place it in the form you have placed on the Input Country Services screen.
Note: make sure that the form is properly selected, otherwise the selected field will not appear in the form.

Next: Place a button and name it "Test web service".

Next place the output field "ISO Code" in the template by selecting it from the Data panel.


The result should look something like this.

Don't forget to Save the Template!
Go back to the Test Country Services flowchart.
Connect the user interaction node with the Start node.
Drag and drop the Invoke web service node onto the canvas and select the "GetISOCodeByCountryName" method.

The last step is to connect the Invoke web service node with the user interaction node. Select the "Test web service" exit.
The result should look something like this:

The result of the Invoke web service node can be returned to the user interaction node by drawing an arrow back and select "Default exit". The result should look something like this.

Test your web service call by previewing the project. The result should look something like this.
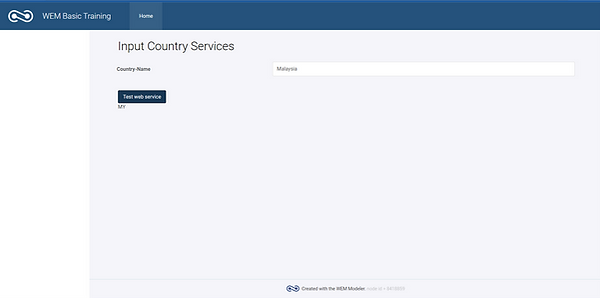
You can test with other countries (e.g. Malaysia, Singapore, United Kingdom, Germany). In the next section we are going to integrate the same web service (consume) in our CRM application.
Integrating a web service with your CRM application
We are going to integrate the "Country services" SOAP web service that we are imported and tested in the previous section in our flowcharts.
Step 1 is to Prepare the integration.
Before we use the "Country services" web service, we have to prepare the input field. We are going to store the "Country name" in our data model list "Company" and use this as an input field for the web service.
Return to the "Company" list in the Data model and add a text field named "Country Name". Also use a technical name "Company.Country Name".

Next add the "Country Name" field to the Form on the "Company details" user interaction node.

Next add the output field "ISO Code" of the Web services (consume) below the Form. The result should look something like this.

Don't forget to Save the template!
Test your modification by previewing your project! Also add country names (for example Netherlands, United States, Germany) to your data, so we can retrieve the ISO Code by the web service.
Invoke web service with Action flowchart
In the previous section we prepared the environment to integrate with the web service. We added the "Country Name" field to the "Company" list and user interaction screens so we can use it as an input field for the web.
Now instead of invoking the web service directly, we are going to use an Action flowchart to do this. If all is correct, the country name is now stored in the database and we can use this country name to invoke the web service and return an ISO code.
First return to Flowcharts on the Home tab and create a new Action flowchart named "Get ISO Code".

The first step in this flowchart is to fill the input field "Country Name" of the "GetISOCodeBy CountryName" web service (consume) method with the stored "Country Name" in the "Company" list.
We are going to use a green assignment node to do this.
Drag and drop a green assignment node onto the canvas. Select the "Country-Name" field from the Input folder of the "GetISOCodeByCountryName" web service method.

Select "Advanced" as Action for the assignment node - in the right hand side bar.

Next click on the Fx button of the Operand property. The WEM Expression editor appears. Select "Country Name" from the "Company" list in the data model.

Click OK.
This way the input field of the web service is filled with the "Country Name" from the "Company List".
Next drag and drop the Invoke web service node onto the canvas and select the "GetISOCodeByCountryName" method.
Next drag and drop an End Node onto the canvas. Connect all the nodes.
Click on the web service node, and in the right panel set Clear Input after call to an On position.
The result should look something like this:
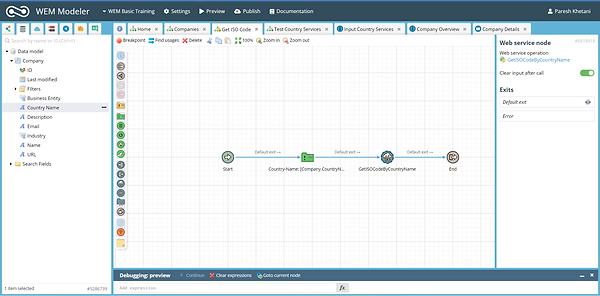
Note: you can check the option "Clear input after call" of the Invoke web service property.
Integrate the action flowchart
The Action flowchart "Get ISO Code" from the previous section is now ready to be used in the Regular flowchart "Companies".
Return to the "Companies" flowchart.
Drag and drop a subflowchart node onto the canvas and select the Action flowchart "Get ISO Code".

Draw an arrow from the "Company overview" user interaction node to the subflowchart "Get ISO Code" and select the "Edit" exit.

Next connect the subflowchart "Get ISO Code" to the "Company details" user interaction node. The result should look something like this.

Test your integration by previewing your project!
Note: when creating a new company, you will see that the last ISO Code retrieved remains. This may not be your intention. You can resolve this by "flushing" the "ISO Code" value from the web service. To do so, use a green assignment node and the action "Clear Value" when adding a new company.

Finish
Congratulations, you have finished your first WEM application. You have learned how to model a simple CRM application in WEM where you can manage, search and filter company data and integrate with external data based on web services. All without coding.
So far, we've tested the application by previewing it. You can easily publish the application to a test or production server.
Optionally you can embellish your application with a different template (look and feel), colours, icons, tables, widgets. Or you can extend the simple CRM application with other data (model lists) such as "Persons", "Locations" or "Address information".
